Best Practice Guide
- About this Guide
- 1 Using the OBS Web UI
- 2 Basic Concepts and Work Styles
- 3 How to integrate external SCM sources
- 4 Publishing Upstream Binaries
- 5 Setting Up a Local OBS Instance
- 6 Bootstrapping
- 7
oscExample Commands - 8 Advanced Project Setups
- 9 Building Kernel Modules
- 10 Common Questions and Solutions
- A GNU Licenses
1 Using the OBS Web UI
This chapter explains and shows how you could use OBS Web UI. We will show and use OBS Web UI based on http://build.opensuse.org. You need to make an account first to follow this chapter contents.
1.1 Homepage and Login #
Open a browser and navigate to https://build.opensuse.org
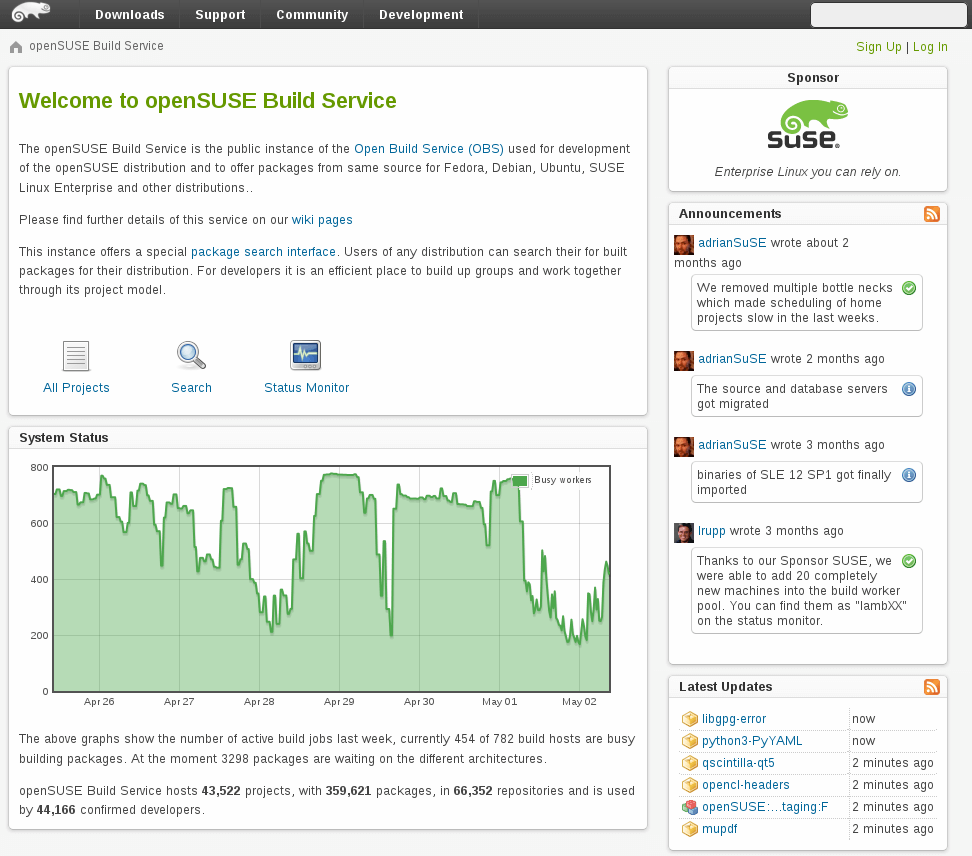
Figure 1.1: Start page #
To proceed, you'll need to log in and authenticate with your username and your password. Click on Login and enter the data in the upper right corner.

Figure 1.2: Login #
After successful authentication, you'll end up on the start page again - with new options visible. We'll go through most of them in detail, but first lets create your home: in the next step.
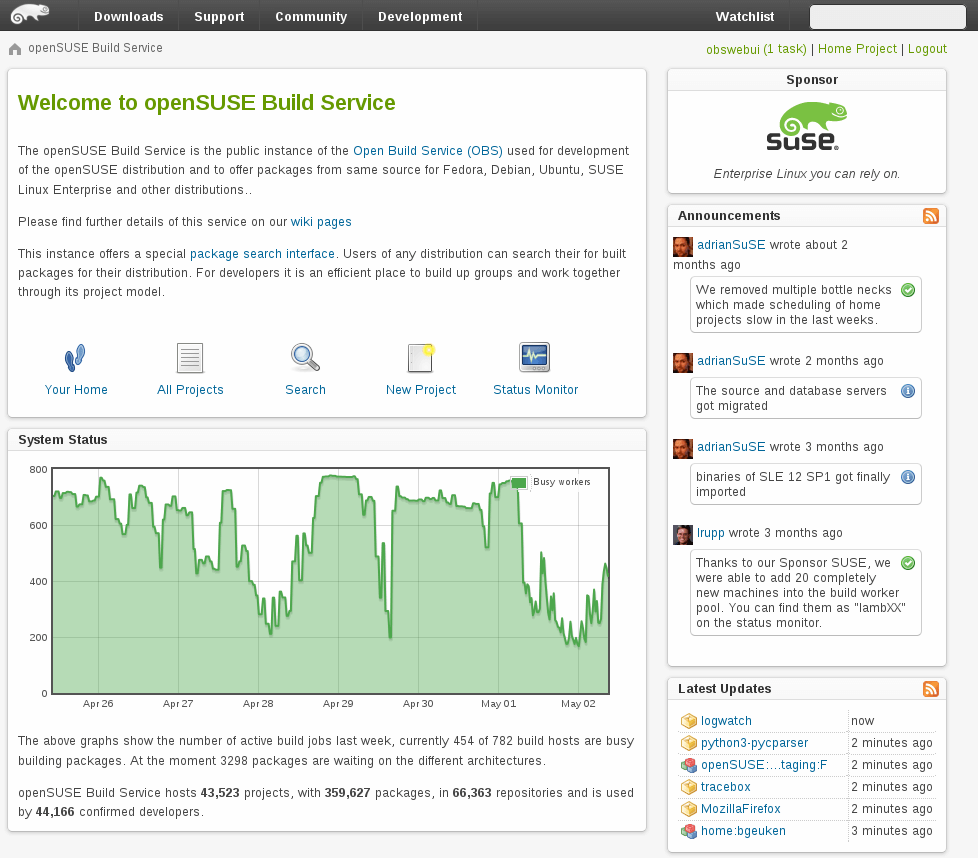
Figure 1.3: Logged in #
1.2 Home Project #
Every user has a home project (home:[userid]) where they have write access by default. This is a personal workspace where you can experiment and play. Click on the link "Home Project" at the upper right to get to your home project.
1.2.1 The Project Page #
Your home project will be empty for now, but you can add packages containing sources/build recipes and projects which are containers for the build targets. As you can see, you're the default maintainer which grants you full write access to this project. You're also the bug owner of your project.
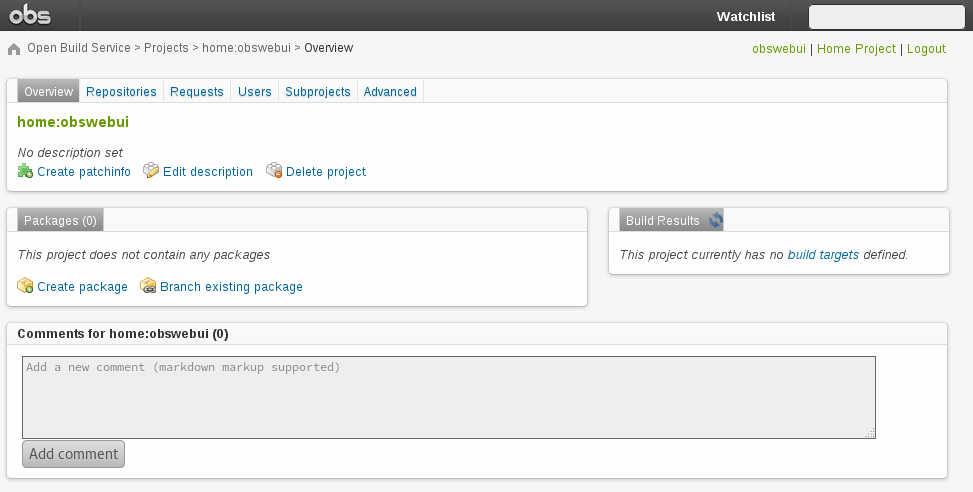
Figure 1.4: Project Page #
1.2.2 Changing a project's title and description #
On every project page you will find a "Edit description" link. This link will lead you to a place were you can review and change your project's title and description. Click on the "Update project" button to save.
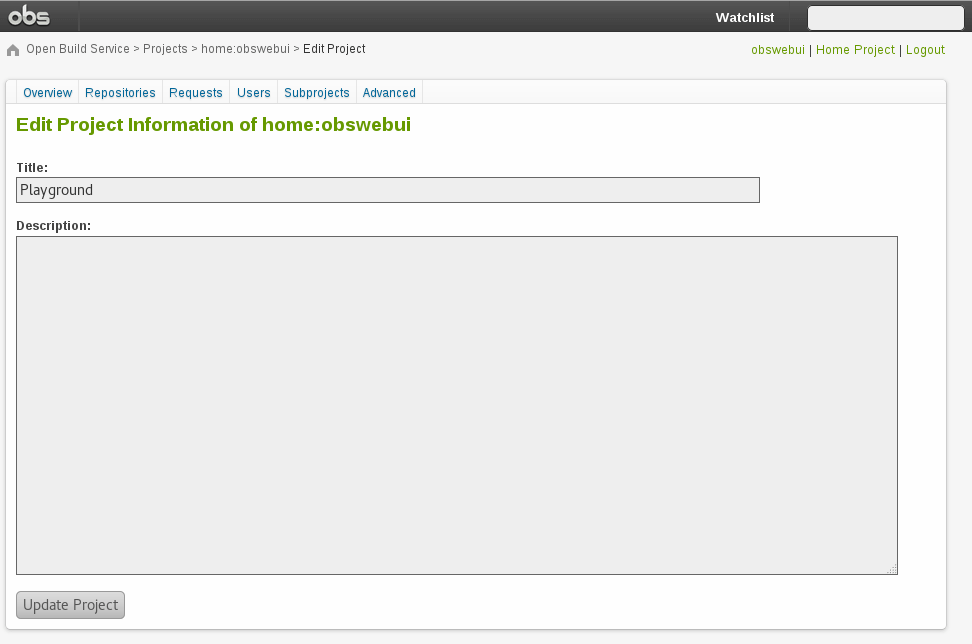
Figure 1.5: Updating project description #
1.2.3 Creating Subprojects to a Project #
Subprojects are projects that are part of another projects namespace. Subprojects are an easy way to organize multiple projects. On the "Subprojects" tab you can find a list subprojects that belong to a project. To create a new subproject click on the "New subproject" link, fill in the form and press the "Create project" button.
Note
Maintainers of upper projects can always modify the subprojects. Apart from that all projects are separated and have no influence on each other.
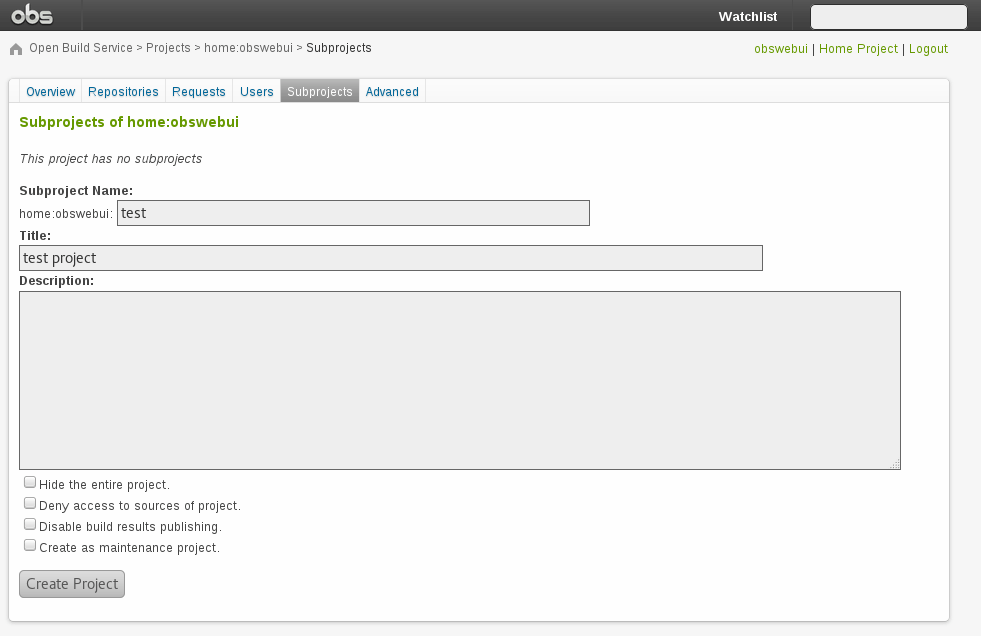
Figure 1.6: Creating Subprojects #
1.3 My Projects, Server Status #
For now, let's leave your home for a bit and explore the build service. Click on "My Projects" on the left at the bottom. This opens a page listing your watched projects and your involvements in projects or packages.
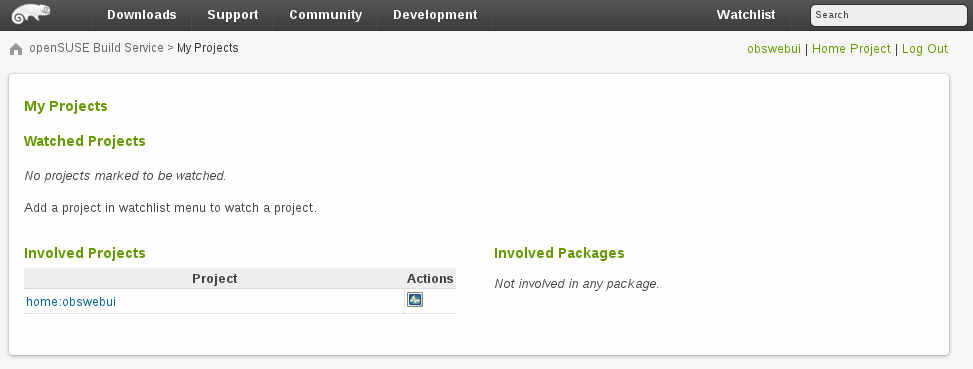
Figure 1.7: My Projects #
Now, let's visit the main monitor page by clicking on "Status Monitor". You see here the status of the services, some graphs and graphics are showing the currently running and completed jobs and the overall load.
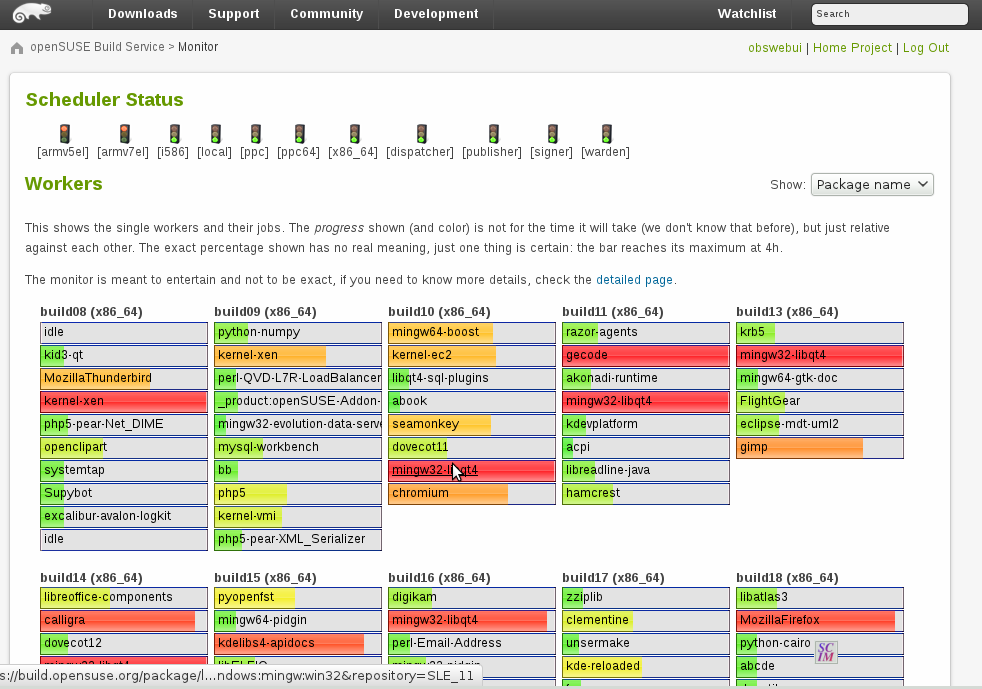
Figure 1.8: Status Monitor #
1.4 Create a link to a package in your home: #
We'll show you how you can log in and use the web interface hosted at build.opensuse.org. This includes login, adding a link to a package in your personal workspace (home:) and how to build that package by adding a repository. First, let's enter "My Projects" by clicking on the link at the bottom left.
Figure 1.9: My Projects #
Now let's create a link to a package and add a repository to build against. A link is basically a pointer to sources of an already existing package. By "repository" we mean container of built binary packages like Debian_8 or openSUSE_13.2. Let's follow these steps:
-
Add link to the existing package.
-
Add repository.
-
Observe the build on the monitor page.
-
Look at package's page.
1.4.1 Add Link to Existing Package #
Right below packages, there's "Branch Package from other Project" .
Figure 1.10: Branch Package #
Open that page and enter for
Name of original project:
Apache
and for
Name of package in original project:
flood
- we'll leave "Name of linked package in target project" empty. This is shown on the next picture:
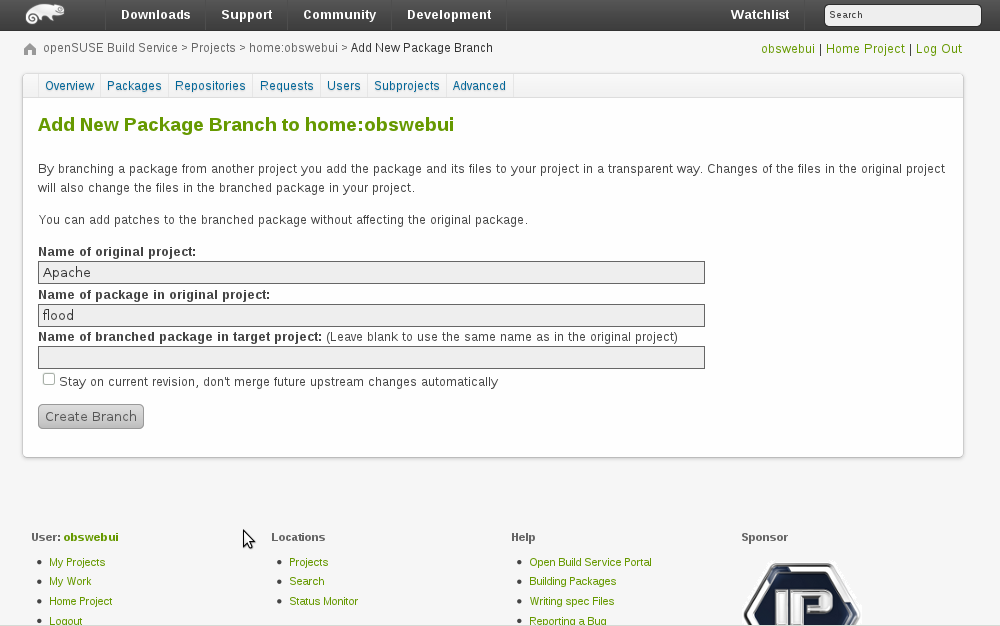
Figure 1.11: Apache Flood Branch #
Proceed with "Create Branch" and you'll be redirected to your home again. You'll see a new package "flood" and a notice about the branch being added.
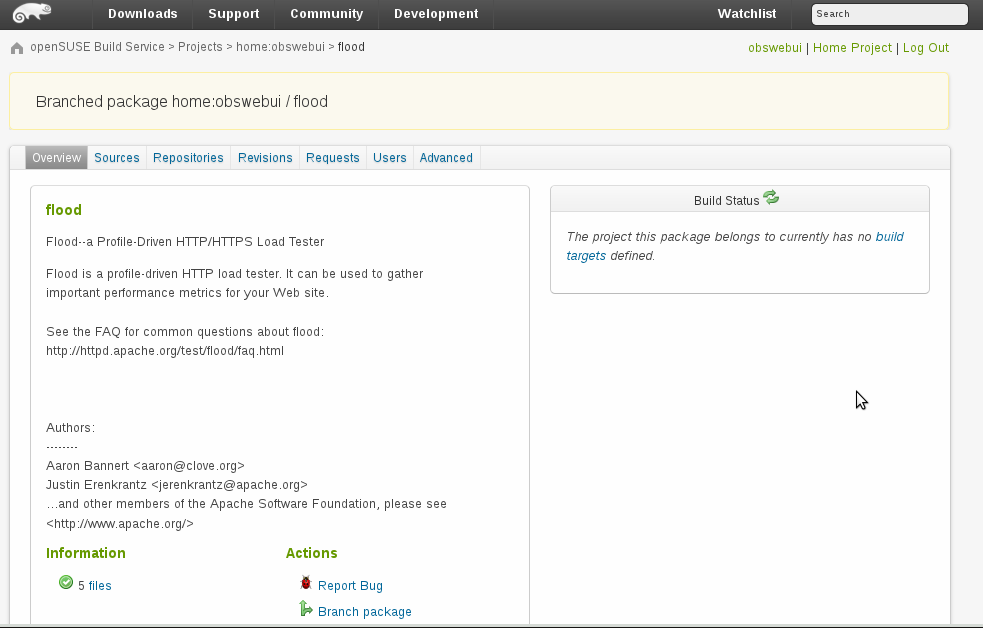
Figure 1.12: Branched Package #
Wonderful, we've added a pointer to the sources! Now we need to add a repository, so the builder knows the target-distribution to build packages for. How to add a repository to a project is documented at Section 1.6.1, “Adding a repository”.
1.4.2 Package Page, Build Log and Project Monitor Page #
Next, it is time to explore the Monitor page, the package detail page and the build log. Just click on the links and explore the web interface. I recommend starting with your home project's top level 'overview' page - click on the Overview tab and you may see something like this:
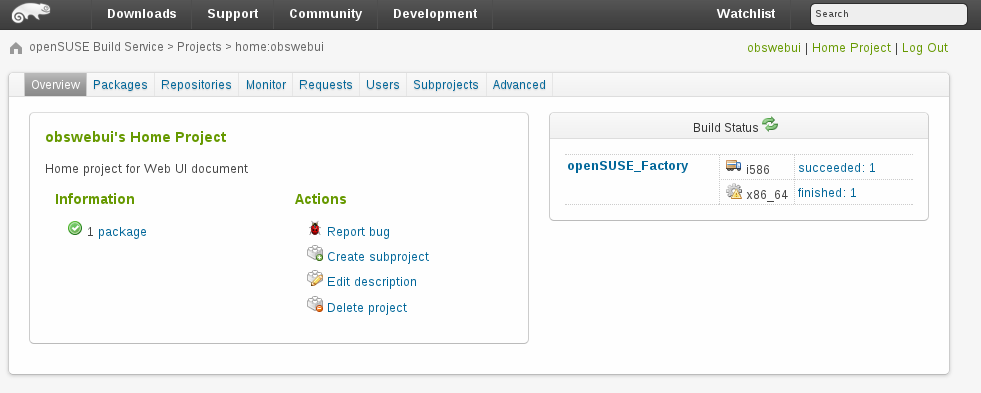
Figure 1.13: flood_succeeded_finished #
If you wait a bit, you would see the below building success screen
Figure 1.14: flood_build_success #
Click the “succeeded” message, then you will see the build log as below.
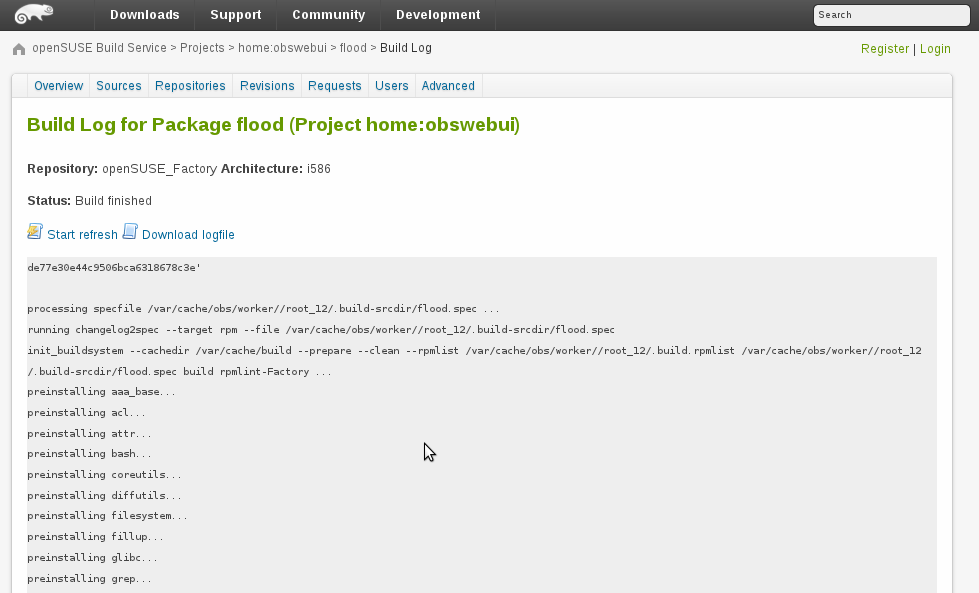
Figure 1.15: flood_build_log #
1.5 Repository Output: Built Packages #
To find the RPMs you built, go to your home project page and click Repositories. From there click on the blue repository name. For example, openSUSE_Factory:
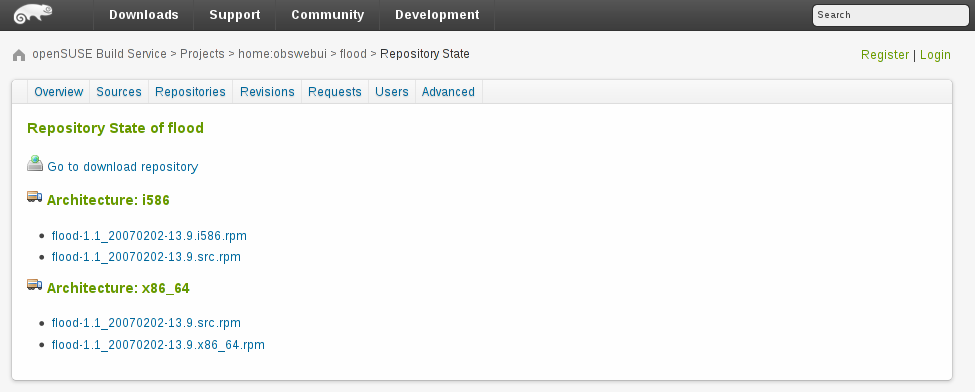
Figure 1.16: My_Repository #
Note
Published repositories are marked with the OBS truck
Now click . Note that publishing the repository might take a while. Before the binary repository is published, you will receive a 404 error. When the binaries are available, you will see something like this:
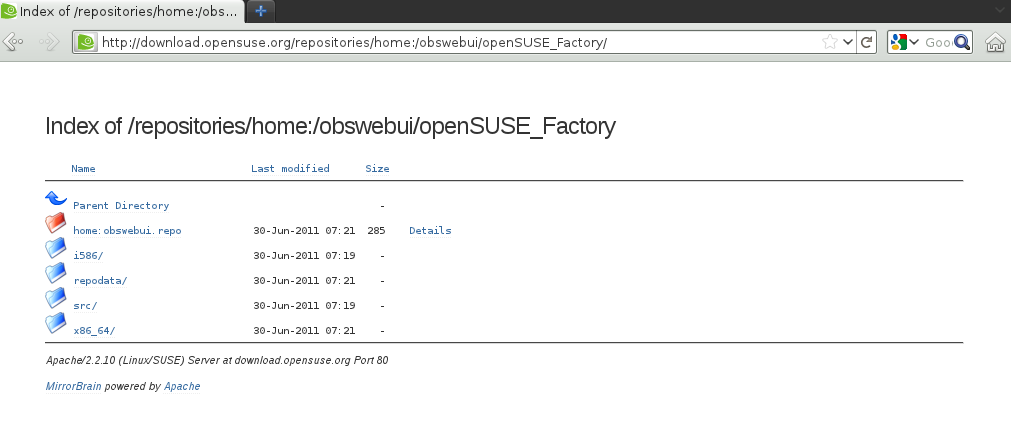
Figure 1.17: Repository Structure #
Your rpms can be found in the subdirectories, and the .repo file is suitable for use with zypper, yum or other repository-friendly package management tools.
1.6 Managing Repositories #
This section will show how you can manage your project's repositories.
1.6.1 Adding a repository #
To add a repository to your project, click on "Add Repositories" on the project's repository tab. This will direct you to a list of possible distributions you can build packages for, see Figure 1.18, “Adding a Repository to a Project”.
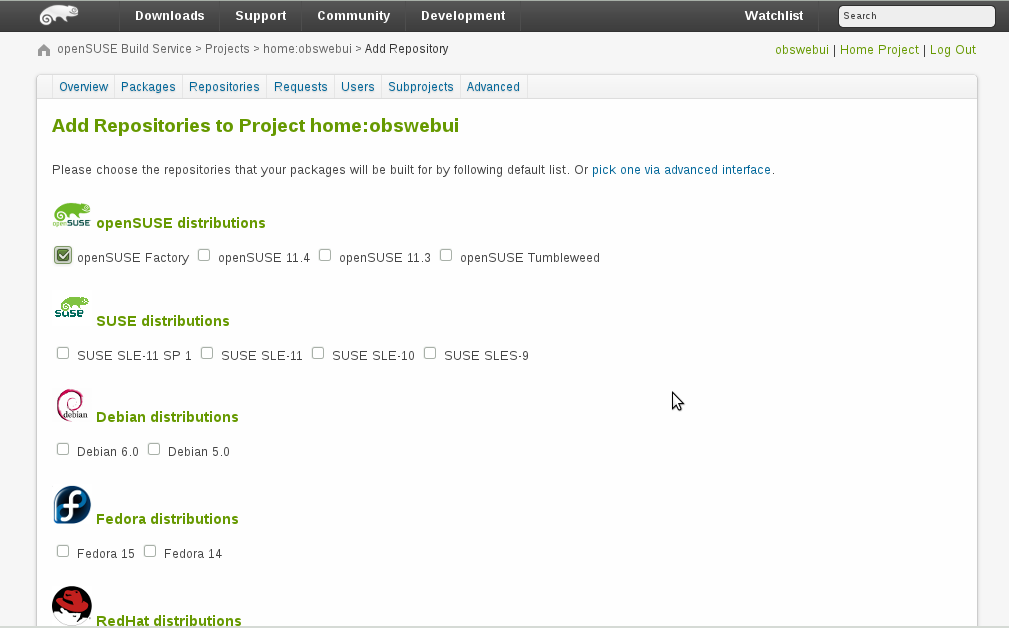
Figure 1.18: Adding a Repository to a Project #
Note
If you could not find a repository that fits your needs, you might want to switch to the expert mode. Click on the "Expert mode" link right to the button. This page allows you to search and select a repository of any project available in OBS and add it to your projects repository list.
This will take you back to your home: project. The build repository might be disabled: if so, click on the cogwheel to enable it. Congratulations, it is configured. On a heavily loaded server, it can sometimes take a few minutes for your changes to become effective, but your linked package will automatically begin building.
1.6.2 Add Download on Demand repositories to a project #
When you have administrator rights you will be able to add Download on Demand repositories to your project. To do so, click on the "Add DoD repository" link and enter your DoD repository data into the form.
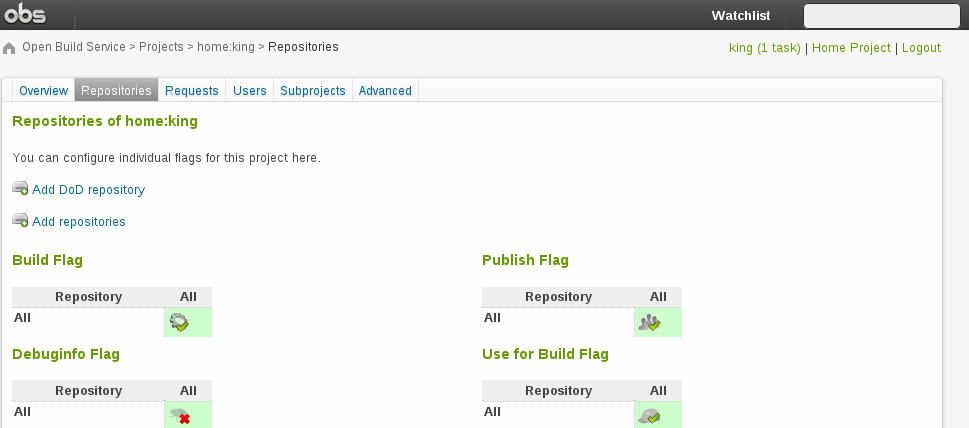
Figure 1.19: Adding a Download on Demand Repository #
The minimal set of fields you have to enter are architecture, repository type and the URL that provides the binary packages. Detailed information about the data you can enter here you can find at the DoD concept section (http://openbuildservice.org/help/manuals/obs-reference-guide/cha.obs.concepts.html#concept_dod). Press "Save" to create the repository.
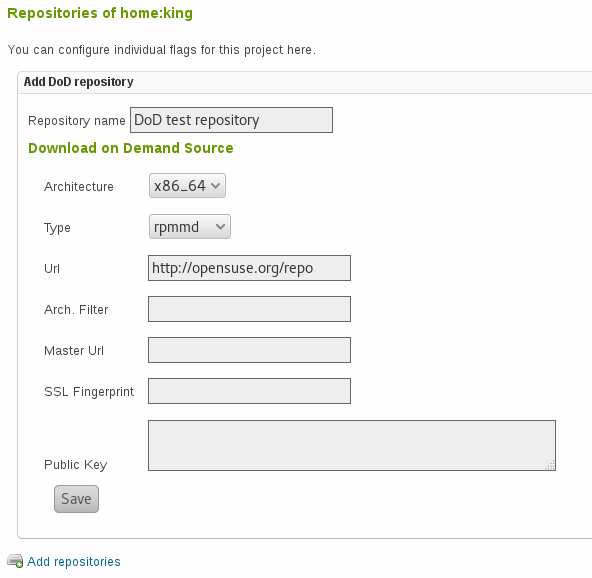
Figure 1.20: Download on Demand Repository Form #
When the repository got added you are able to edit, delete or add additional DoD repository sources.
1.6.3 Adding DoD Repository Sources to a Repository #

Figure 1.21: Adding Download on Demand repository sources #
Open the DoD repository sources form by clicking the "Add" link. Here you can enter your additional DoD repository source. Click the "Add Download on Demand" button.
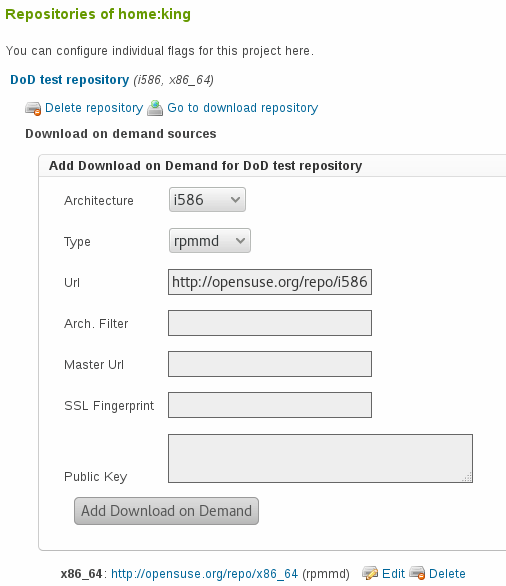
Figure 1.22: Form for Adding DoD Repository Sources #
1.6.4 Editing DoD Repository Sources #
To edit DoD repository sources after they got added click on the "Edit" link that you find right to each DoD repository source.
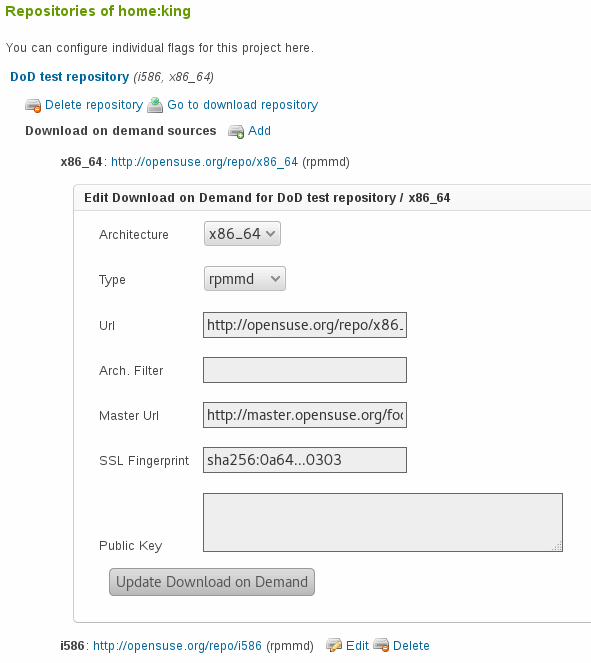
Figure 1.23: Form for editing DoD repository sources #
1.6.5 Editing DoD Repository Sources #
To delete a repository or repository source, click on the "Delete" link and accept the confirmation dialog.
1.7 Image Templates #
Image templates are pre-configured image configurations. The image templates page (https://build.opensuse.org/image_templates) provides a list of these templates. Users can clone these templates and further configure them as they like.
How you can create your own image templates will be shown here.
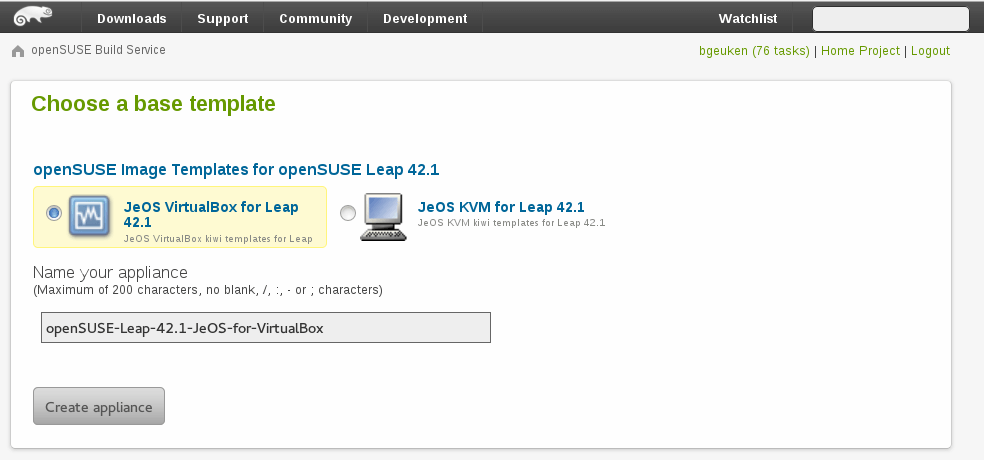
Figure 1.24: OBS Templates Page #
1.7.1 Creating Own Image Templates #
Create a subproject of your home project.
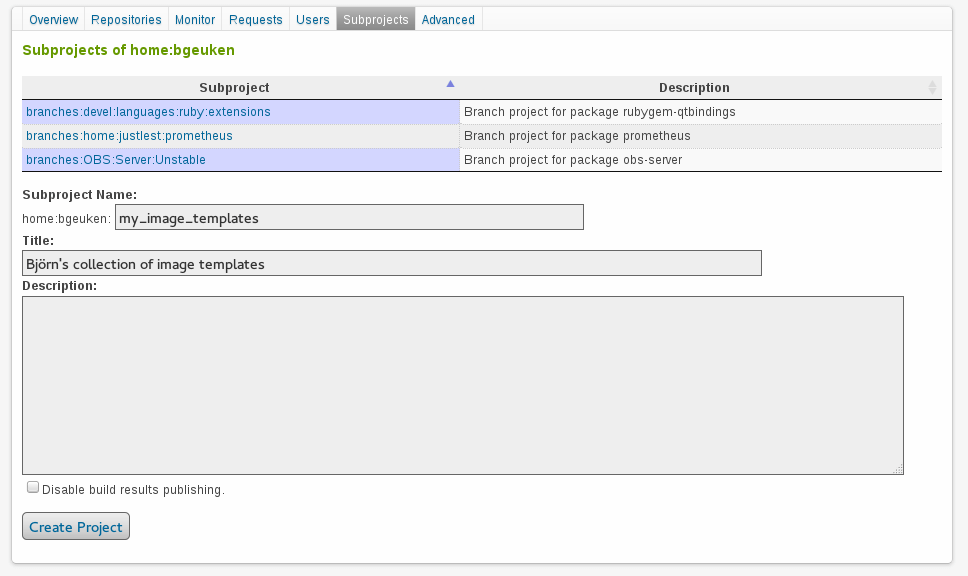
Figure 1.25: Form for creating image template subproject #
Note
Published image templates are fetched via a project's attribute. Any package container living in a published project will be visible on the image templates page.
Within that project create a new package. That will be your actual image template.
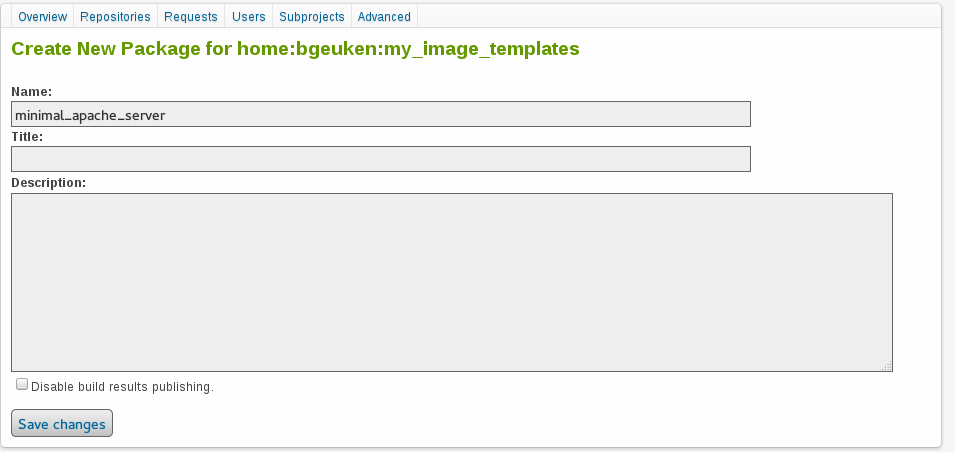
Figure 1.26: New Image Template #
Add the 'KIWI image build' repository to your project. This repository is needed to build KIWI images in your project. Go to the 'Repositories' tab, click on 'Add repositories' and click on the 'KIWI image build' check box.
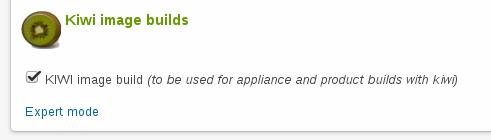
Figure 1.27: Enabling the KIWI Image Build Repository #
Add sources for your image configuration.
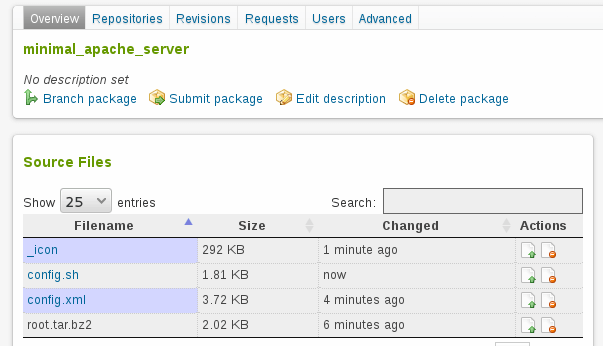
Figure 1.28: Overview of Sources of a Custom Image Template #
KIWI configurations usually consists of an xml configuration root tarball.
In addition, you can define an
icon for your image templates by adding graphical image (for example, PNG,
JPG) to your template sources and name it _icon. If that
file exists, it will be used as icon for your image on the image templates
page.
For a full list of image descriptions and general information about building images with KIWI, see the KIWI project page (http://opensuse.github.io/kiwi/) and the KIWI cookbook (https://doc.opensuse.org/projects/kiwi/doc/).
1.7.2 Publishing Image Templates on the Official Image Templates Page #
Once everything is set up and your templates are building, you might want to publish them. In that case contact the admin of the OBS instance you are using and ask them kindly to do so. If you happen to use the official OBS (https://build.opensuse.org/), that would be admin@opensuse.org.
1.8 KIWI Editor #
You can edit the KIWI file associated to your project. It is only possible, at the moment, to edit the repository list and packages with type image. If you are running your own instance of OBS be sure you have the kiwi_image_editor feature enabled in your config/feature.yml file.
1.8.1 Accessing the KIWI Editor #
Go to your package, and upload a file with the .kiwi extension (for example,
test.kiwi), with valid KIWI content.
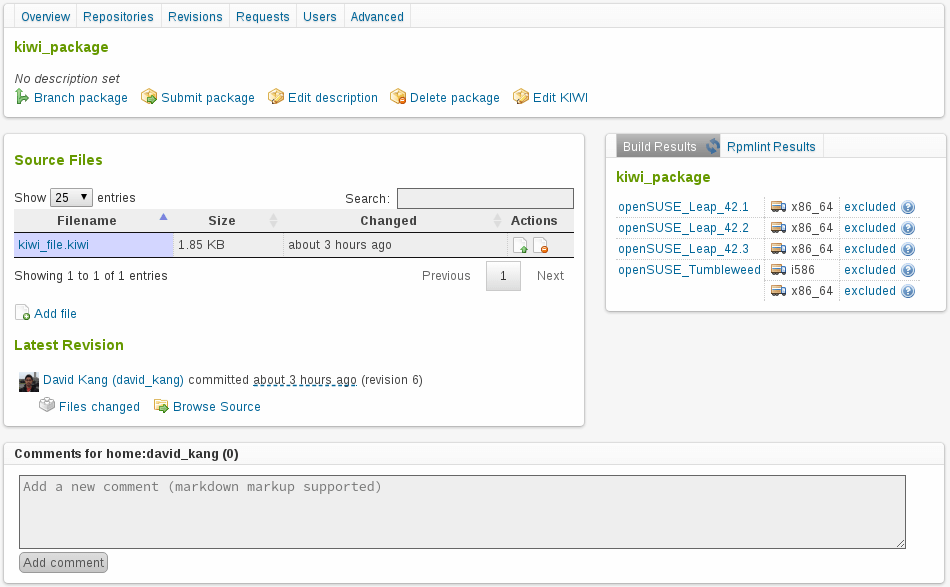
Figure 1.29: Example of a Package with a KIWI XML File #
Note
You should see now a "Edit KIWI" link (next to "Delete package" link).
Click on the "Edit KIWI" link and you will be redirected to the Editor.
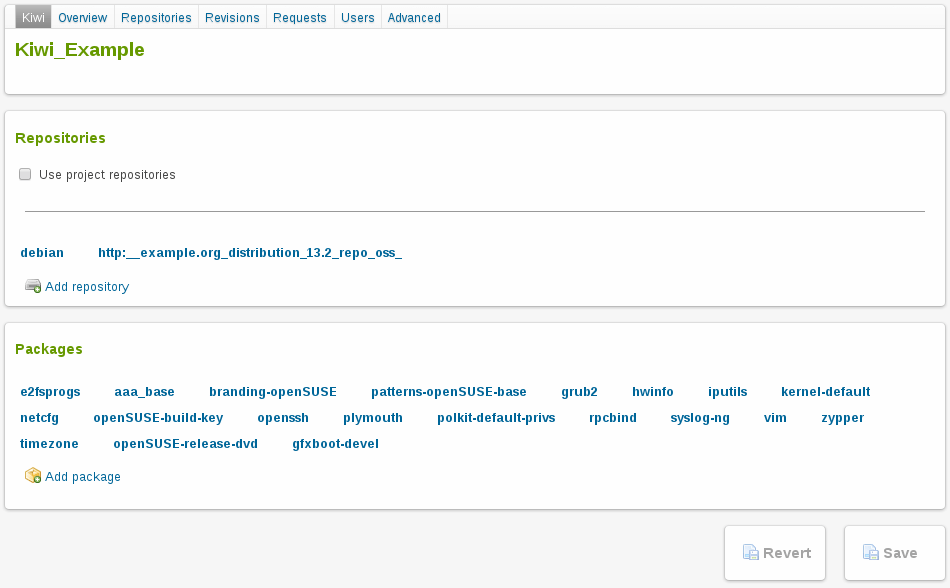
Figure 1.30: KIWI Editor. Show screen #
-
Repositories: Displays the repositories set in the Kiwi file.
-
Packages: Displays the packages of the package group with type image.
1.8.2 Adding Repositories in the KIWI Editor #
To add a new repository click Add repository link and fill in the dialog. There are two ways to create it:
-
Basic Mode: Adding the name of a project will provide a list with the repositories from that project.
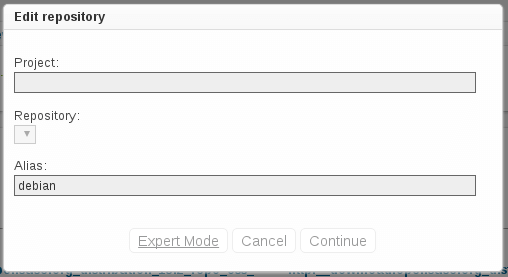
Figure 1.31: KIWI Adding a new repository - Basic Mode #
-
Expert Mode: This mode provides you with a set of customizable parameters for creating a repository.
-
Type: Valid options are rpm-md and apt-deb.
-
Priority: Repository priority for the given repository.
-
Alias: Alternative name for the configured repository.
-
Source Path: Define the repository path.
-
User: Specifies a user name for the given repository.
-
Password: Specifies a password for the given repository.
-
Prefer License: The repository providing this attribute will be used primarily to install the license tarball if found on that repository.
-
Image Include: Specifies whether the given repository should be configured as a repository in the image.
-
Replaceable: Defines a repository name which may be replaced by the repositories specified in the image description. This attribute should only be applied in the context of a boot image description.
-
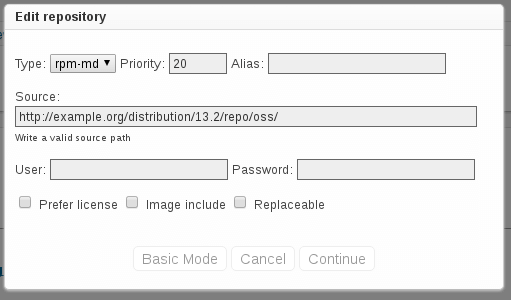
Figure 1.32: KIWI Adding a new repository - Expert Mode #
To use the configuration of the current project check the Use project repositories checkbox.

Figure 1.33: KIWI Use project configuration #
Note
This option will remove the other repositories from your kiwi file.
1.8.3 Adding Packages in the KIWI Editor #
Adding a package is practically the same as adding a repository. We offer an autocomplete for the package name that will show you the package available in the repositories added previously.

Figure 1.34: KIWI Adding a new package #
Note
The package groups shown in the editor are only those with type image and the packages will be added in this kind of package group. If it did exist previously the KIWI Editor creates a package group with type image for you.
1.9 Manage Group #
Only administrators and users with Maintainer rights can manage groups. They can add and remove other users from the group, as well as give them Maintainer rights.
On the Group Members tab, there is a link to Add Member, then enter the name of an existing user. You can click on the Maintainer checkbox to give Maintainer rights to a user.
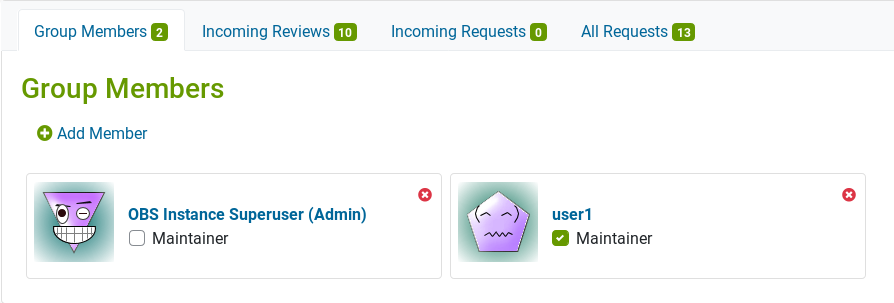
Figure 1.35: Manage a Group #
1.10 Staging #
At the moment, it is possible to create a Staging for any kind of project unless the project is already one of the staging projects.
All the Staging workflow starts in the tab 'Staging' which can be found on the project's page. It will take you to the first step to create a new Staging or to the dashboard if the Staging already exists.
1.10.1 Creating a Staging #
The creation of a Staging will automatically create two staging projects as a subproject of the main project. Before creating, we need to select a group of managers, they will be in charge of assigning requests to the staging projects and also excluding requests from the Staging.

Figure 1.36: Creating a Staging for openSUSE:Factory #
Note
An Admin should previously create the manager groups.
1.10.2 Start using it #
In this view, we can find all the staging projects with an associated request and their current state.
Figure 1.37: Staging Show screen #
-
Table content:
-
Staging Project: Shows the staging project name, its overall state (see legend), and the overall build progress of the packages within the project.
-
Requests: Show the associated requests and their current state.
-
Problems: Shows build problems of packages within the project and status problems reported to the Build Service's Status API by external services like openQA.
-
-
Info section:
-
Managers: Shows the Staging Managers group.
-
Empty projects: Staging projects without assigned requests.
-
Backlog: List of requests that can be assigned to a staging project.
-
Ready: List of requests that were in the backlog and have an accepted review.
-
Ignored: List of requests excluded from this staging workflow.
-
1.10.3 Delete a Staging #
By clicking on the delete button on the Staging index page, we are able to delete a Staging. By selecting the associated staging projects in the appearing modal window, we are able to delete them as well. If not selected, they will remain as regular subprojects.
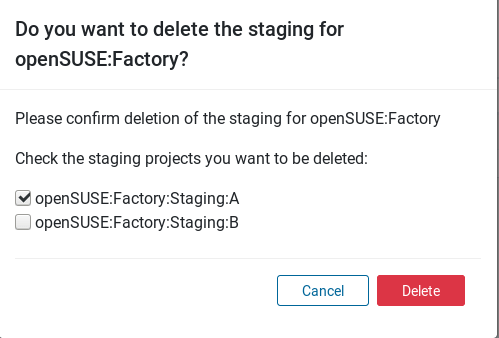
Figure 1.38: Delete a Staging Workflow #
1.10.4 Configuration #
It is possible to create/delete staging projects (openSUSE:Factory:Staging:A, openSUSE:Factory:Staging:B, etc) and change the Managers Group of the Staging.
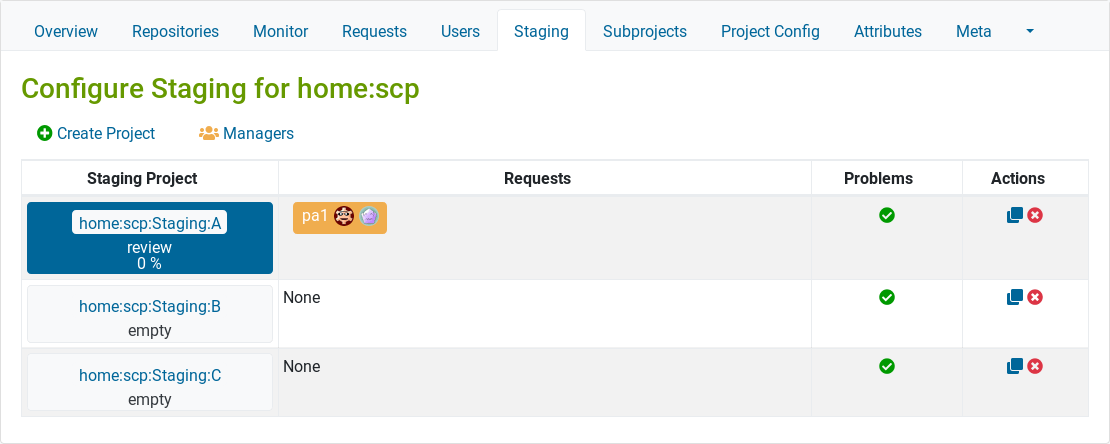
Figure 1.39: Configuring a Staging #
Note
Changing the Managers Group of a Stanging will automatically unassign the old group and assign the new group to the related staging projects.
1.10.4.1 Create Staging Project from Scratch #
Right after the creation of a Staging, two new staging projects are automatically created and assigned to it: Staging:A and Staging:B. However, it is also possible to create a new staging project from scratch.
On the Staging dashboard, click on Configure and then on Create Project to add a name for the new staging project.
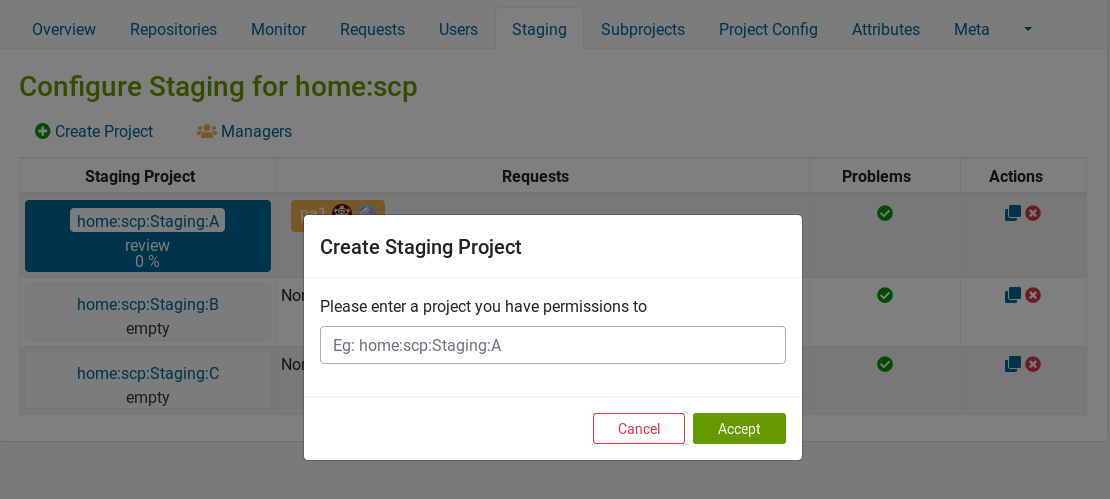
Figure 1.40: Create a New Staging Project #
1.10.4.2 Create Staging Project from Template #
It is possible to create a staging from a template. Inside Staging Configure page, simply choose the staging project you want to copy from (the template), click on its Copy icon on the actions column and add a new name. The staging project copy is processing on background, so there might be a delay before it shows up.
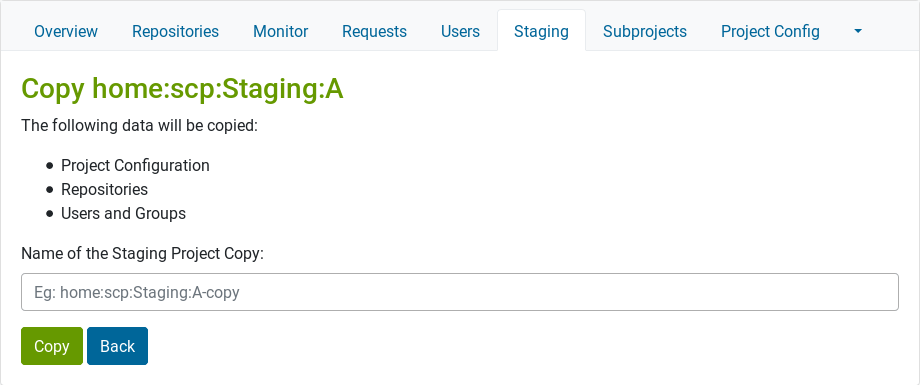
Figure 1.41: Copy Staging Project from Template #
1.10.5 Staging Project #
A staging project contains requests assigned by a Staging Manager. An overview page is provided for a staging project where you can find more detailed information about the requests, reviews and checks.
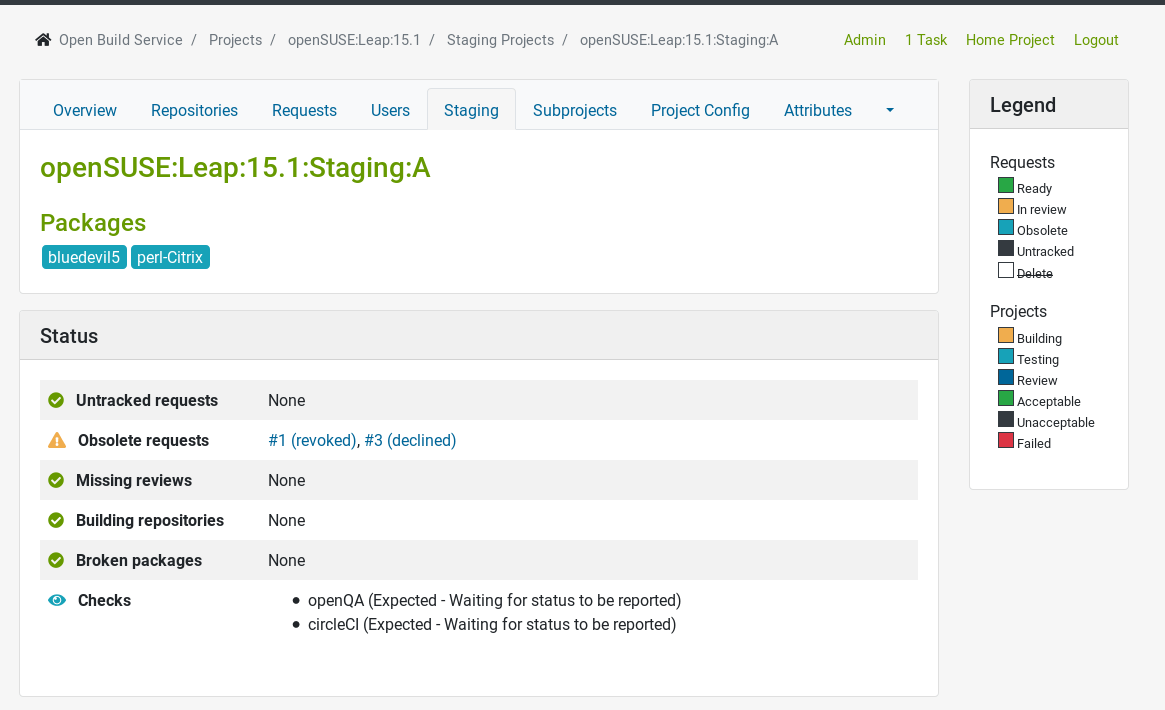
Figure 1.42: Looking into a Staging Project #
-
Obsolete Requests: Requests that were declined, revoked or superseded.
-
Missing Reviews: Requests with pendings reviews.
-
Building Repositories: List of packages that are still building.
-
Broken Packages: List of packages with failling builds.
-
Checks: List of checks of the staging project.
All the actions performed on requests that are assigned to the staging project are tracked. They are listed in the 'History' section.
